| |
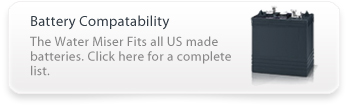
 NOTE: Flow Systems vent caps including the Water Miser Battery Vent Cap, can be utilized as replacement caps for all Trojan Golf Cart Batteries, US Battery Golf Cart Batteries and Exide Golf Cart Batteries. NOTE: Flow Systems vent caps including the Water Miser Battery Vent Cap, can be utilized as replacement caps for all Trojan Golf Cart Batteries, US Battery Golf Cart Batteries and Exide Golf Cart Batteries.
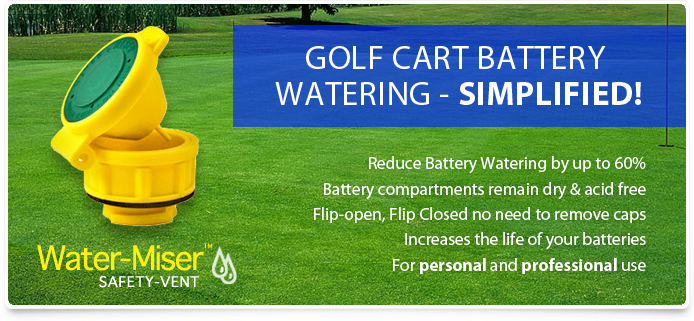
Watering and Maintaining Golf Cart Batteries
Imagine if charging Golf Cart Batteries was the only thing you had to be concerned with, but it's not. Watering batteries time and time again is never an easy job. The battery vent caps have to be removed and often times end up on the floor. Not to mention the exposure to noxious fumes and the sulfuric acid that covers over charged golf cart batteries.
What if you could alleviate the frustration, the mess and time associated with keeping your batteries at optimal levels? What if there was a revolutionary, easy to install solution that made this entire process practically hands free?
Introducing the Water Miser Battery Cap for Golf Carts... |
|
Typically, Golf Cart batteries come equipped with traditional bayonet or screw in type vent caps. This type of vent cap, while effective for its basic intended purpose, is lacking in many ways. The Water Miser Safety Vent is the next generation in battery technology that addresses the shortcomings of older style bayonet vent caps. The Water Miser Battery Cap is the first truly effective Flip Top Vent Cap that never needs to be removed, reduces watering intervals and keeps your cart's interior battery compartment clean.
Simply remove the original battery vent caps that come with your batteries and replace with the Water Miser Safety Battery Vent Caps. Its that easy! |
| |
|
|
|
|
| |
|
|
| |
Water Miser Maintenance Advantages: |
| |
|
|
| |
 |
Batteries Stay Drier - Golf Cart battery and battery cell covers remain much drier. Build-up of moisture from escaping sulfuric acid mist in the golf cart battery compartment area is virtually eliminated. When batteries are properly maintained, Water Miser Safety Battery Caps also assist in alleviating acid leakage on to maintenance facility or garage floors that sometimes can occur from overcharged batteries. |
| |
|
|
| |
|
Reduce Watering by 50% to 60% - With traditional or originally installed 1/4 turn bayonet type vent caps, there is no barrier to prevent acid gasses from escaping the golf cart battery. The Water Miser Battery Cap takes a different approach by introducing an integrated hydrophobic filter combined with a separate condensing medium through which all escaping gases must pass through. This two stage process practically eliminates all moisture from ever leaving the battery so routine watering is needed less often. |
| |
|
|
| |
|
Eliminates Corrosion - Golf cart battery corrosion stems from excess electrolyte escaping from the battery cells. When a sufficient amount of acid carrying electrolyte accumulates on and surrounding the golf cart battery, corrosion takes its tole. Corroded battery terminals and battery cables are no longer a concern after installing the Water Miser Battery Vent. |
| |
|
|
| |
|
Reduced Acid Mess - The handling of acid laden golf cart battery vent caps is a thing of the past - the built in “anti-splash” device assures that a minimum of electrolyte is propelled into the immediate area when the “flip top” is opened for inspection or watering. |
| |
|
|
| |
|
Batteries Last Longer - Any remaining residual gases that escape through the Water Miser's moisture retention medium during the charging cycle, carry fewer electrolyte laden droplets, assuring that electrolyte gravities are stabilized within the battery cell(s) – Thus resulting in consistency of intended cell voltages and capacity characteristics. |
| |
|
|
| |
|
No Need to Ever Remove Vent Caps - With already limited access and cramped spaces, there is no need to ever remove the Water Miser Vent-Caps . Easily inspect or water your batteries, just flip open the vent cap and when finished, flip closed. |
| |
|
|
| |
|
Virtually Fume Free Batteries - The Water Miser Safety Vent affords the operator a greater safety factor as he now works in a more friendly, fume freer environment made possible by the multi-features incorporated in its comprehensive and practical design. |
| |
|
|
|
|
| |
|
|
| |
Golf Cart Battery Maintenance Guide |
| |
|
|
| |
| Tools Necessary for Proper Golf Cart Battery Maintenance » |
[close] |
|
Batteries, as the power source in an electric golf cart, are probably the most misunderstood of all the vehicle's components . To ensure maximum performance and prolong the life of the battery, proper battery maintenance and watering is imperative. Should one decide to shoulder the responsibility of a maintenance program, proper equipment such as a volt meter, a hydrometer, battery pliers or appropriate wrench, a wire battery brush, rubber gloves , goggles and a petroleum based terminal protector are a necessity.
|
| |
| Neutralizing Acid on Golf Cart Batteries and Battery Compartments » |
[open] |
|
Now that all necessary tools are at hand, and once the batteries are installed in the golf cart, the first responsibility is to make certain that all cable connections are correctly positioned from the positive terminal (s) to the negative terminal (s). Normally the positive is marked with a plus sign (+) and the negative with a negative sign (-).
In other than new batteries, and before the next step, fill a spray bottle with a solution of 1/4 cup of baking soda to ½ gallon of water (6 to 1 ratio).
After checking the water levels in each cell, and if watering is necessary, spray the tops and sides of the batteries, the battery cables, the wiring and the battery racks with the baking soda solution – let the solution remain for at least five (5) minutes to allow the neutralization to occur. You can also clean the battery terminals and cable clamps by first disconnecting and cleaning them with the wire brush and then reconnecting them.
Now rinse the batteries, cables, wiring and battery rack with a fine low pressure stream of water. Do not wash electrical components with a direct stream of high pressure water. And don't forget to wash the vehicle frame.
Should you still see any evidence of corrosion (green powdery foam), repeat spraying several times until the area appears free of the corrosion. Never wash the batteries without first neutralizing the entire battery area with the baking soda solution. Cleanse the batteries every thirty (30) days as explained above…..it's considered good maintenance practice. Plus, one now will have eliminated the random grounding which occurs when the battery covers are damp with the electrolyte.
This "Random" grounding is a result of the micro-droplets of the electrolyte being carried by the escaping gasses during the charging cycle at which time they are deposited on the battery cover, the battery hold-down and elsewhere within the battery compartment. They are extremely corrosive and can be the cause for the batteries to "Self discharge" via grounding to the battery hold-down and then to the golf cart frame.
|
| |
| Applying Anti-Corrosive Protective Gel » |
[open] |
|
It's good practice to now apply one of several petroleum based anti-corrosive jells to cover each terminal connection after checking to assure that all terminal bolts/nuts are securely tightened. This will keep the terminals protected from any randomly laden sulfuric acid fumes. It would not hurt to also coat the battery "Hold-Downs" as well as the threaded bolts and hold-down rods. Make it a point to now check and determine if all battery hold-downs are secure. Remember, the golf cart is subjected to some moderate jolting as it transverses the fairway and one doesn't want those expensive batteries bouncing around for 36 holes.
|
| |
| Checking the Water (Electrolyte) Level » |
[open] |
|
Now, remove the battery vent-caps and make an initial check of each cell to determine if they are watered to the proper level. The water level in each cell should be no more than ¼ inch above the separator protector. If the electrolyte (water) can't be seen, then add just enough water to bring the water level up to the correct level. Again, ¼ inch above the separator protector.
Note: Never add more than the above indicated amount prior to charging or pumping will occur that forcefully pushes water through the vent caps.
|
| |
| How to Clean Batteries after "Pumping" » |
[open] |
|
Immediately following the charging cycle water should be added to bring the levels up to and touching the BOTTOM of the COVER VENT WELL which is easily visible. This assures that there will be no "Pumping" of the electrolyte during the charging cycle.
Pumping is the result of several factors. First, the over-filling of the cells. Next is the expansion of the electrolyte from heat during the charging cycle and last is the electrolyte expansion from the gassing while the batteries are on charge. All these factors combined cause the electrolyte to greatly expand within the cell and be forced upward and exiting through the vent-cell orifice. The batteries, the golf cart compartment and depending on the severity of the PUMPING, the floor at the charging station are all victims of the corrosive sulfuric acid…..this could have been avoided with proper watering.
What now? One's has a real "Clean-up" job ahead….to neutralize both the acid on the batteries and in the battery compartment as well as on the floor just use the baking soda and water solution as described in an earlier paragraph.
Before applying the baking soda water solution to the battery covers, one must make certain that all vent-caps are securely tightened. One now can apply the neutralizing solution sparely via the spray bottle to the tops of the batteries. Do not over-spray forcing the neutralizing solution to enter the vent-cap openings- although this is not likely to happen. Next, one can attach the floor – just pour the soda solution on the floor and flush with water.
|
| |
| Pre-Charge Checklist» |
[open] |
|
At this point, one should have gained sufficient knowledge to successfully conduct a battery maintenance program as related to golf cart batteries. Now we can move on to the proper approach to the charging of golf cart batteries.
How many owners of golf carts really understand those batteries that power their vehicle ….some do, some don't. It's imperative that one has a basic knowledge as to the relationship between the batteries and the charging equipment.
Before connecting the batteries to the charger:
- Inspect all cables and terminals to assure that they are both clean (corrosion free) and securely fastened and/ or bolted to the battery posts.
- Be sure to check the electrolyte level in each cell to make sure that the level is at least ¼ inch above the separator protector/splash plate. If not, add either distilled or approved water to bring the level to the proper height.
- Check to make certain the charging equipment is in the "OFF" position.
|
| |
| Charging Golf Cart Batteries» |
[open] |
|
Now, plug the power cord of the charger into the golf cart’s DC power adapter port. . Let the batteries charge until the charger turns off. Golf cart batteries should remain on the charger overnight to obtain the best results .
Some chargers will have no lights illuminated when the charging cycle is complete, while others may have a green light to show the end of the cycle. One can now grasp the power cord and pull it out of the power adapter port once the batteries have been fully charged. It might be advisable to have at hand a hydrometer to check finish specific gravities to determine the state of charge.
In the case where alligator clips are used to connect the batteries to the charging equipment, one must squeeze the red clip and remove it first from the positive battery terminal and then remove the black alligator clip last. The reason being that as long as the batteries are grounded via the negative cable, there will be no sparks when removing the positive cable. Since the possibility of hydrogen gas still potentially being present within the battery compartment, one averts the danger of an explosion triggered by an unintentional spark.
One now should have the basics of a battery maintenance program that assures 36 holes of trouble free transportation around that favorite golf course!
|
| |
|